
Setting up your 20i mailbox in Outlook is quick and easy. We make use of ‘autodiscover’ technology, which means that in the majority of cases, Microsoft Outlook can set up your account for you with only an email address and a password.
Here’s our walk through video on how to set up your 20i mailbox in Outlook:
Automatic Outlook Setup
- In Outlook, choose the File tab
- Under Account Information, choose Add Account
- On the Auto Account Setup page, enter your name, email address, and password, and then choose Next
- Choose Finish
Manual Outlook Setup for your mailbox
If automatic setup failed, you can choose Manual setup or additional server types to enter your settings manually. Use these settings:
- Account type: IMAP
- Incoming mail server: imap.stackmail.com.
- Outgoing mail server: smtp.stackmail.com.
- Incoming server port (IMAP): 993
- Use the following type of encrypted connection: SSL
- Outgoing server port (SMTP): 465
- Use the following type of encrypted connection: SSL/TLS
When setting up your account, please choose More Settings > Outgoing Server and check the box for ‘My outgoing server (SMTP) requires authentication’.
If you experience any problems with the connection or receive a certificate warning, please disable SSL/TLS encryption and change the incoming server port to 143.
You can also set up the account using POP3, however this is not recommended in general as emails will be downloaded to the mail client you connect to the mail server.
- Account type: POP3
- Incoming mail server: pop3.stackmail.com.
- Outgoing mail server: smtp.stackmail.com.
- Incoming server port (POP3): 995
- Use the following type of encrypted connection: SSL
- Outgoing server port (SMTP): 465
- Use the following type of encrypted connection: SSL/TLS
There’s a quick and easy way to set up email on your iPhone or iPad. On the device you wish to set up mail:
Auto-Configuration
- Head to Manage Hosting > Options > Manage.
- Select Email Accounts.
- Select Options > Account Setup.
- You’ll then see the Download iOS Mobile Profile button, select this to download the correct information to your iPhone to set up your email account.
- Review and install the profile on your phone, you’ll need to enter your mailbox password to complete the setup.
Manual Configuration
To set up your 20i mailbox on an Apple iPhone or iPad, you need to:
- Head to the Settings icon and locate the Mail option.
- Go to Accounts.
- Then select ‘Add Account’.
- Select Other from this list.
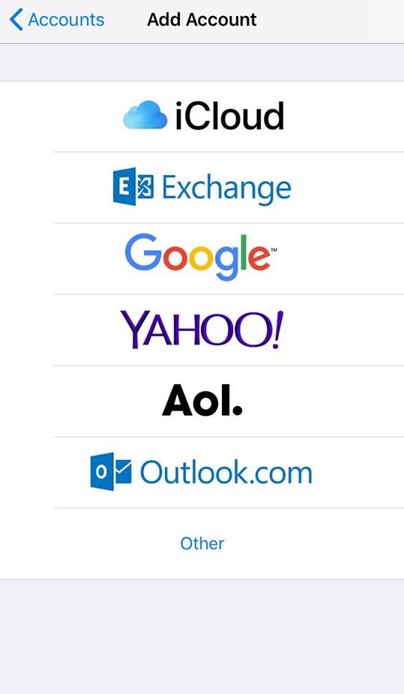
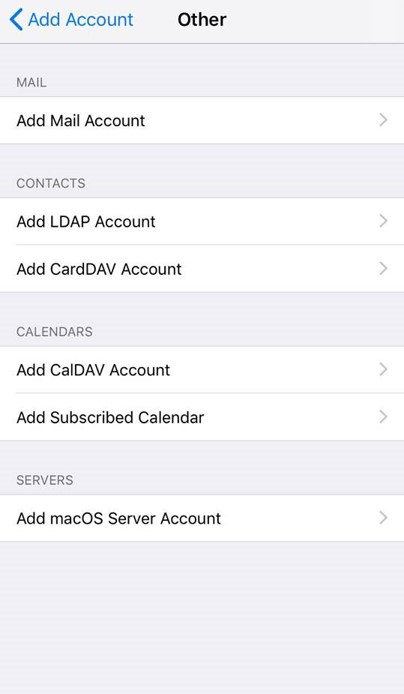
- Select Add Mail Account.
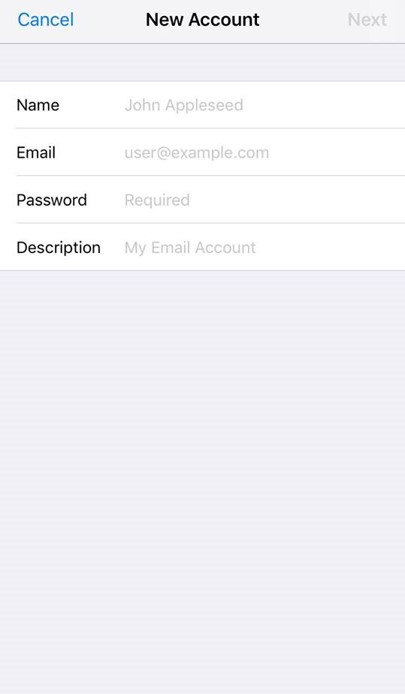
- Input the information requested:
Name: Anything
Email: example@yourdomain.com
Password: Mailbox Password
Description: Work, Business…etc
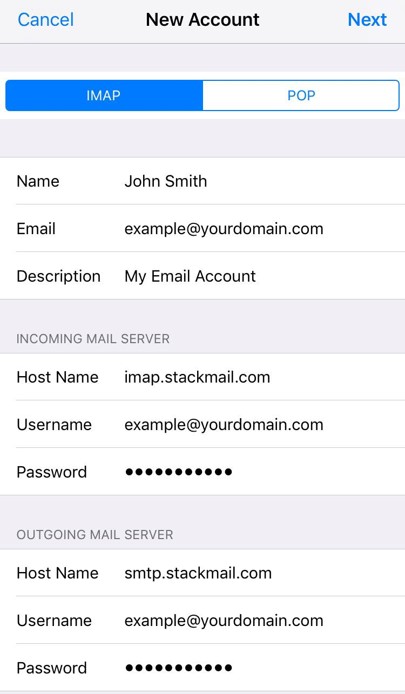
IMAP:
Incoming Mail Server
Host Name: imap.stackmail.com
Username: example@yourdomain.com
Password: Mailbox Password
Outgoing Mail Server
Host Name: smtp.stackmail.com
Username: example@yourdomain.com
Password: Mailbox Password
- Finally, select the mail account and go into the Outgoing Mail Server settings. Select Primary Server, make sure SSL is switched on and the port is set to 587.
Here’s how to set up a 20i email on an Android phone or tablet:
- Open the mail application on your Android device.
- Select Add New Account and enter the mailbox name and it’s password.
- Select Manual Setup and select IMAP Account.
- The User name will need to be the same as the mailbox name.
- Enter imap.stackmail.com as the IMAP Server, change the Security Type to SSL, Port 993 should then be used.
- Enter smtp.stackmail.com as the SMTP Server, change the Security Type to SSL, Port 465 should be added.
- The outoing mailserver User name and Password are the username and password for your mailbox.
- Select Sign In and the mailbox will be added to your Android.
